
Over the past year or so I’ve been trying out Resilio Sync (formerly BitTorrent Sync) as a possible alternative to Dropbox. It’s gradually improved to where I think I can rely on it. With my Dropbox subscription up for renewal in a couple of weeks, now’s the time. In this post I’ll describe how to set up Resilio to get a Dropbox-like experience.
What I want from file syncing
I’ve used Dropbox for several years now. Their original feature is the only one I’ve ever cared about. I get a folder on my Mac that transparently syncs to my other Mac. I can also access files from an iOS app. Dropbox has built a bunch of other stuff onto their service, but I don’t care about any of that. I want files to sync between Macs, and that’s it.
For a variety of reasons I’ve been moving toward having direct control over my online data instead of using external services. For example, rather than rely on Cloud App to quickly share files online, these days I prefer Dropshare with my own server. It does more or less the same thing but I control where my data goes. It won’t disappear because some company has been aqui-hired by another one or whatever. And so it is with Dropbox. It’s not exactly the same situation since files on Dropbox still exist on my Mac. But I’d prefer to keep things more directly under my control if possible.
I looked at a variety of sync options and rejected most of them. Reasons varied, but I found that the quickest test of a sync system was checking how it handled symbolic links. My only real technical gripe with Dropbox is that it won’t copy symbolic links as symbolic links. Instead it follows the links, which can cause duplicate files.
Some would (and have) argued against this as the right way to do things. No matter; it’s the right way for me. Most sync services fail this in one way or another. Some resolve the links, Dropbox-style. Some ignore them. Often the services would have other faults, but this test fails so frequently that it’s the first thing I try when evaluating a sync system. Resilio handles symbolic links the way that I consider to be correct.
Resilio also offers a couple of nice benefits. It’ll sync directly from one Mac to another over my local network without needing to upload everything to a server first. And I can set up as many shared folders as I want, in any location on my Macs.
I should clarify that Resilio is sync software based on the BitTorrent protocol. They make an app that runs on your Mac (or other computer) but they don’t provide an online sync service. You can add one of your own if you like. More on that later.
Syncing from one Mac to another
In the simple case of syncing between Macs it’s, well, simple. There are several steps, but only because I’m trying to be as detailed as possible.
- Download the app on both Macs.
- On one Mac, add a folder to Resilio.
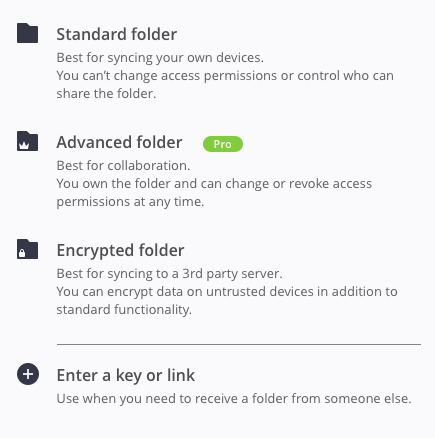 Either the “standard” or “encrypted” folder options work here. I suggest “encrypted”, for reasons I’ll get into later. It allows keeping files encrypted but doesn’t require encryption. Choose any folder on your Mac that you want to sync. As long as you can read/write the folder from your account on the Mac, it’s fair game.
 - Copy one of Resilio’s unique keys for this folder. You’ll find these by clicking the “options” button for the share, and then “Preferences” in the menu that pops up.
 Then click “View Key” in the window that appears. There are three types of key; you’ll want “Read & Write” to sync between Macs. There’s also an “encrypted” option I’ll cover later, and a “read only” key.
 - Get this key to another Mac however you like. Keep it secret.
- On this other Mac, add a folder, but this time select “Enter a key or link”. Enter the key.
- Resilo will ask you which folder to use on this Mac. Choose or create one. It doesn’t have to have the same name or be in the same location as on the first Mac.
Now your Macs will sync files in these folders, directly. Add multiple Macs if you have more.
For a lot of people this is all you need. You might be done! The only real drawback here is that syncing will only happen between Macs that are online at the same time. If there are several Macs sharing a folder, they don’t all have to be on at once. If one of the Macs is always online, it’ll sync with any others when they’re online, and act as the central sync for all of them.
But server space can be rented so cheaply these days that you don’t need to keep one Mac on all the time.
Adding a virtual private server to the mix
I’ve been talking about adding Macs to Resilio, but it also runs on other platforms. Most interesting for this post, it runs on Linux and can be configured remotely. That means you can buy space at any VPS provider and add your virtual server(s) to the mix. That gives you an always-on computer to sync with for just a few bucks a month.
I run Resilio at Digital Ocean. They’ve worked well for me in the past, but if you have a VPS service you like, the’ll probably work just as well. If you don’t and you use that link to Digital Ocean, we’ll both get a referral bonus. Depending on your setup it could be worth 2 months of service.
Your VPS doesn’t need a lot of CPU horsepower or memory. It needs enough disk space to hold your synced files. I’m currently using Digital Ocean’s $5/month plan for Resilio, which gets me 512MB of memory and 20GB of storage. If you use them, their new “volumes” option is a good way to boost disk space without buying more memory that you don’t need.
So let’s run through the setup. I’ll note that while this is not extremely difficult, it’s nowhere near as easy as Mac-to-Mac syncing, and requires comfort with Linux command lines. I’d like to suggest a simpler approach but I don’t know one right now.
-
Create a new VPS– a “Droplet” at Digital Ocean. Mine is a basic Ubuntu Linux 16.04 setup. Digital Ocean offers to install an SSH key when creating the droplet. Do this, because command line access will be useful.
-
Create a user account on the VPS. This isn’t strictly necessary but I don’t like to log in as root unless I have to. I’ll set up an account that can use
sudoand then use this account when I log in. SSH in to your VPS (as root, initially), create the user account, and give itsudopowers:% adduser <username> % usermod -a -G admin <username> -
Install Resilio. I followed the steps described at Resilio’s site, somewhat simplified here to fit my needs. Since I’m using Ubuntu Linux, these steps use the Debian package manager. If your Linux prefers RPM, see Resilio’s article for details.
-
Add Resilio package information to
apt-get:% sudo cat > /etc/apt/sources.list.d/resilio-sync.list deb http://linux-packages.resilio.com/resilio-sync/deb resilio-sync non-free -
Add the public key so
apt-getcan verify Resilio packages:% wget -qO - https://linux-packages.resilio.com/resilio-sync/key.asc | sudo apt-key add - -
Tell
apt-getto update, and install Resilio. This step also creates a new user account calledrslsync, which Resilio will use when running.% sudo apt-get update % sudo apt-get install resilio-sync -
Add Resilo as a system service:
% sudo systemctl enable resilio-sync
-
-
Now Resilio is installed and running but not yet configured. It has a web based interface, but it only listens on 127.0.0.1 so you can’t get to it remotely– unless you use SSH port forwarding. I added something like this to my
~/.ssh/config.Host [my VPS's IP address] User [my username created above] LocalForward 9888 127.0.0.1:8888 IdentityFile ~/.ssh/id_ed25519With this in place, and an SSH session active, I can point my browser to
http://localhost:9888/gui. SSH turns that into a connection to port 8888 on the VPS, coming from 127.0.0.1. -
Before configuring Resilio, you need to give it some place to store its files on the VPS. This can be anywhere you like, so long as the user
rslsynccreated above has write access to it. I decided to use/opt/resilio:sudo mkdir /opt/resilio sudo chown rslsync /opt/resilio -
Now, finally you can configure Resilio using the web interface. The web interface is nearly the same as in their Mac app. To add an existing shared folder, copy the folder key like you did earlier, only this time copy the “encrypted” key instead of the “read & write” key. This way, your files will be encrypted on the VPS. If the VPS is insecure for any reason, your files won’t be readable there.
When Resilio asks for a directory to keep the files in, navigate to the location you chose in the previous step and use the GUI to create a new sub-folder. If your share is named “mystuff”, create
/opt/resilio/mystuff. Using a sub-folder will make it easier to add other shared folders in the future, which will all go in the same place.
And you’re done! You have always-on automatic file syncing. Just add files to whichever folders you added to Resilio. Start moving files from your Dropbox folder into your new Resilio folder(s).
Soon after reaching this point I got an email from Dropbox that began “We noticed that you recently deleted a large number of files from your Dropbox.” Well, yeah.
A couple of other notes
-
Resilio has an iOS app, which can browse and download documents. You add folders as on Mac or Linux. Unlike on a Mac, it doesn’t attempt to sync all files. Instead you browse the shared folder and can download individual files.
-
One VPS might not be enough redundancy for some people. That’s fine; you can set up as many as you need. Run them at different data centers, or at different VPS services. Think of it as applying RAID 1 at the VPS level.
Keeping Dropbox, a little
I can’t completely drop Dropbox. Mainly because their API means that various apps can sync files via Dropbox. I really like Editorial on iOS, for example, and it uses Dropbox to sync documents across my devices. Reslio has an API but I haven’t looked into it yet. In any case it’s nowhere near as widespread as Dropbox.
The majority of the files I sync aren’t managed directly via the Dropbox API, though. They’re just files. I can keep Dropbox’s free account level and keep using my apps, while keeping the bulk of my file syncing in Resilio.